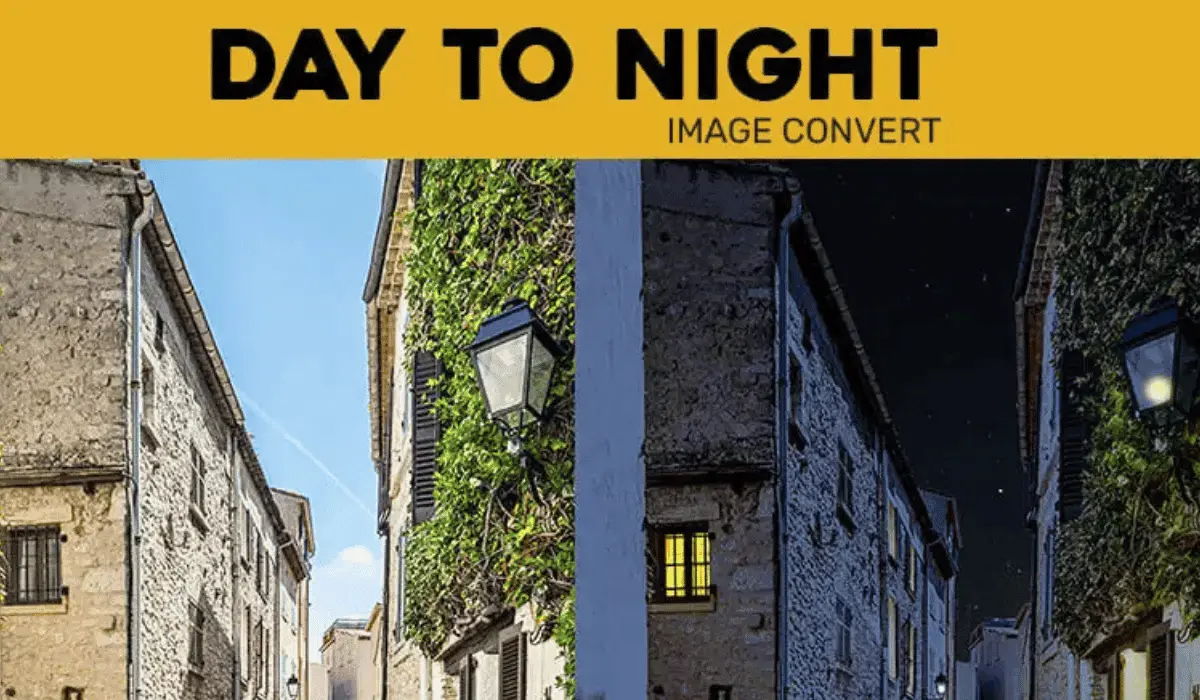
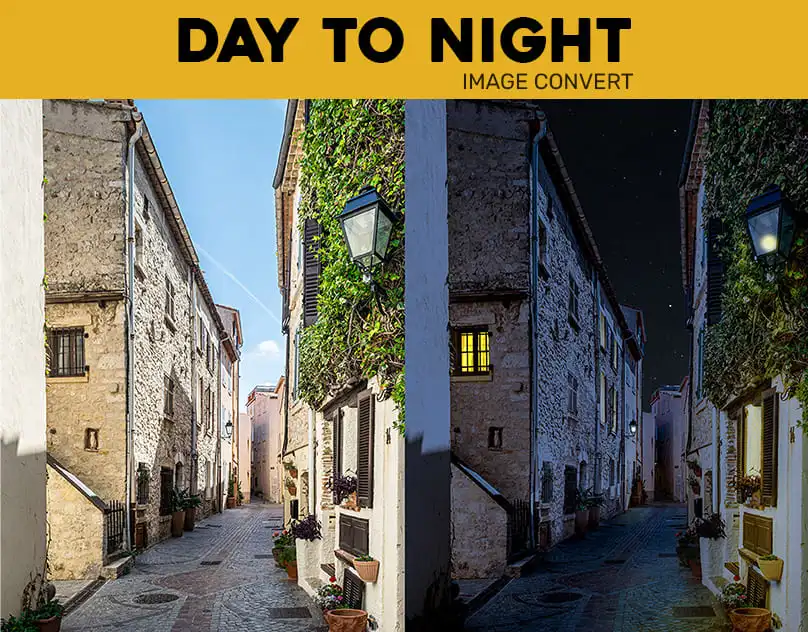
How to Change Day to Night Photo in Photoshop: Full Tutorial (Step-by-Step Guide)
In addition to giving your photos visual interest, making dramatic day-to-night changes in Photoshop teaches you a variety of effective picture editing skills.In this blog, we’ll go into great detail on how to use Photoshop’s high-end tools to transform a sunny daylight shot into a dramatic, nighttime image.
Regardless of your level of experience with picture editing, this blog provides a comprehensive guide on how to master adjustment layers, LUTs (Look-Up Tables), gradient maps, blending modes, and brush masking to create a gorgeous dual tone night effect.
Step 1: Begin with a Superior Daylight Photo
 Choosing a clean, bright daytime photo is the first step in the process. Images of buildings, streets, or landscapes are particularly well suited for this metamorphosis.
Launch Photoshop, then select File > Open to open your image.
As these components aid in establishing the highlights and shadows necessary for the finished night look, make sure the picture has adequate lighting and contrast.
Pro Tip: For greater color grading freedom, use RAW photos.
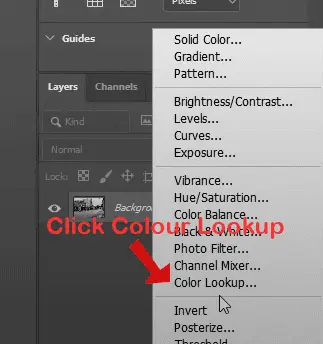
step 2 : Apply a Color Lookup Adjustment Layer (LUT) in.
First, apply a Color Lookup Adjustment Layer to your image to change its mood.
Click the Adjustment Layer icon in the Layers window.
Choose Color Lookup.
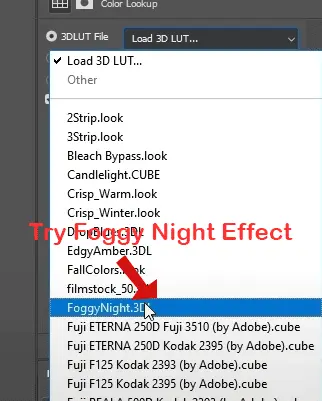
Then select 3dLut NightFromDay. under 3DLUT File.
For other tones, try the Moonlight or Foggy Night LUTs.
LUTs are strong presets that instantly provide a nighttime tint to your picture. Realistic nighttime tones are superbly simulated by the “Night From Day” LUT in particular.
Step 3: Include a Layer for Curve Adjustment to Provide Depth

Add a Curves Adjustment Layer to adjust the lighting:
To make shadows darker, drag the curve’s left point (blacks) a little bit to the right.
To make highlights brighter, drag the whites (right) point to the left.
The deeper, sharper lighting that we frequently associate with nighttime photography is produced in part by this contrast augmentation.
Tip: To fit the mood, you may also adjust the Red, Green, and Blue channels separately.
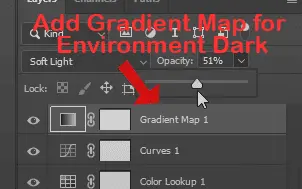
Step 4: Use a Gradient Map to Style Colors

With gradient maps, you can use specific gradients to remap the tones in your image.
Select Gradient Map from the Adjustment Layer icon.
To access the Gradient Editor, click the gradient bar.
Choose a gradient with darker hues, such as dark blue, deep purple, or navy, by navigating to the Basics folder.
Press OK.
Select Soft Light as the Blending Mode for the Gradient Map layer.
Opacity can be lowered to about 50% for a more understated, dramatic effect.
This contributes to the stylish dual tone look that is ideal for a midnight or evening atmosphere.
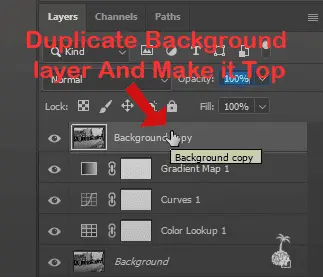
Step 5: Make a copy of your image and separate it for light effects.
We are now ready to make our own light sources, such as lights or windows that glow:
Choose the layer of your base image.
To duplicate it, press Ctrl + J on Windows or Cmd + J on Mac.
In the Layers panel, drag the duplicate layer to the top.
To make an inverted mask (one that is filled with black), hold down Alt/Option and click the Add Layer Mask icon.
With this arrangement, you may mimic artificial lighting by revealing specific areas of the image.
step 6 : Add a photo filter in to create warm lighting effects.
Warm light sources, such as windows or lamps, give your scenario more realism.
Above your duplicate image, add a Photo Filter Adjustment Layer.
Select the 85 Warming Filter.
Raise the density to about 85%.
To make a clipping mask, hold Alt/Option and click between the duplicate image and the Photo Filter.
You can now localize the warm lighting effects because the photo filter only affects the copied layer.
Step 7: Apply Layer Mask Paint to Light Areas
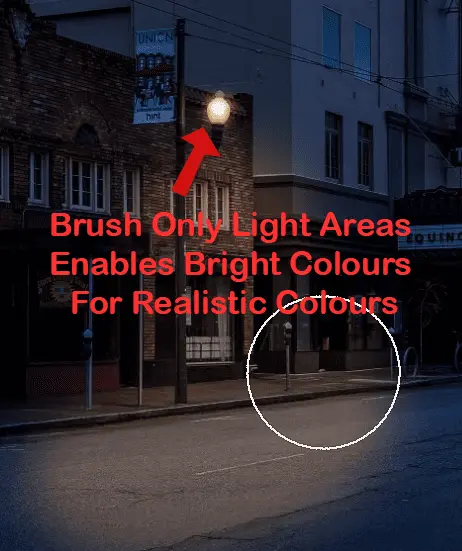
We “turn on” the lights now.
If you previously turned off your Color Lookup Layer, turn it back on.
Click on your duplicate image’s black Layer Mask.
(B) Choose the Brush Tool.
To make the foreground color white, press X.
Adjust the opacity to 30–50% and the brush hardness to 0%.
You can paint windows, street lighting, or any other place that seems to be lit up.
This stage improves realism by giving you complete control over the locations of the light sources.
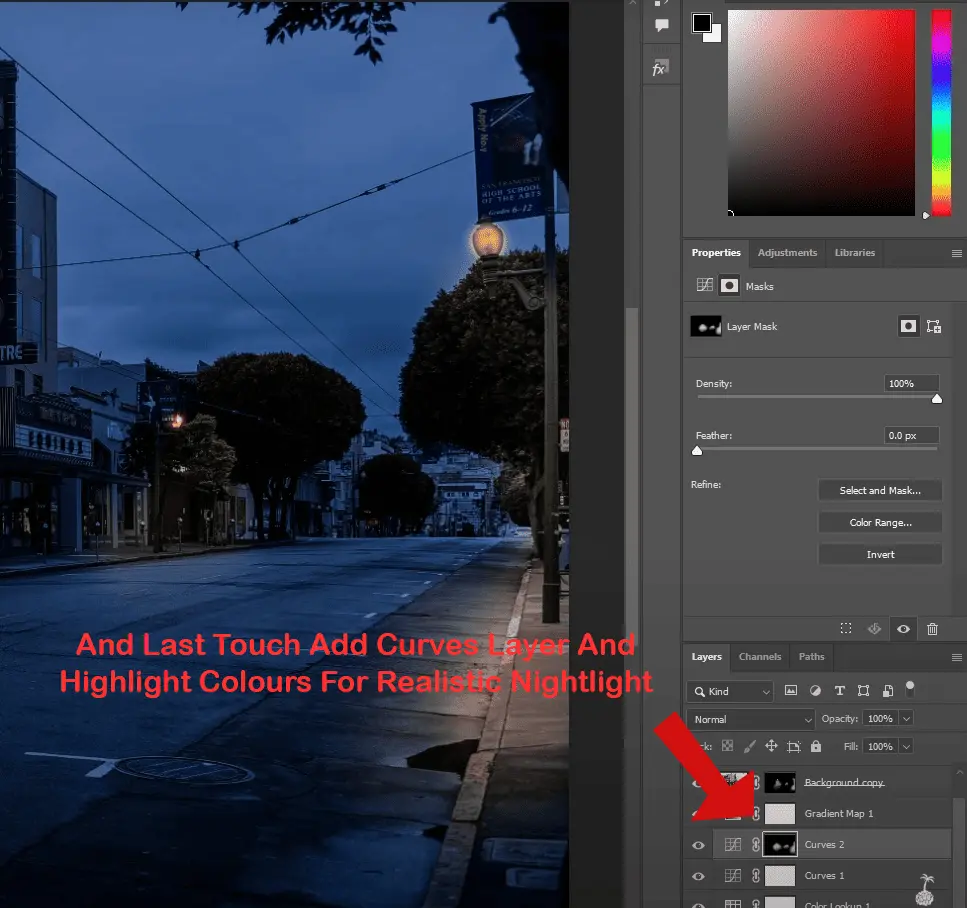
Step 8: Use a Curves Layer to Add More Shine
To mimic bright highlights or moonlight:
Another Curves Adjustment Layer should be added.
To make it brighter, drag the right handle up.
Use Ctrl + I or Cmd + I to flip the layer mask.
Paint highlights on surfaces such as building outlines, pathways, and rooftops with a soft white brush.
This adds a finishing touch and intensifies the tone of the dual lighting.
Step 9: Adding a vignette or sky overlay is optional.
Add ambiance to your nighttime shot if you’d like:
Make a fresh layer.
Apply black paint around the edges with a big, gentle brush.
Reduce the opacity and set this layer to multiply.
Use the Screen or Lighten modes to combine an overlay image of a star or moon for the skies.
Step 10: Export, Group Layers, and Final Review
After you’re happy:
Examine every layer.
You may group modifications by using Ctrl + G or Cmd + G.
Save your PSD so you may make changes later.
Your finished image can be exported as a WebP, PNG, or JPG.
Photoshop day to night tutorial
Photo editing tutorial night effect
Cinematic night look Photoshop
Realistic night photo effect
Color lookup Photoshop night LUT
Gradient map for night tone
Convert daytime to night photo Photoshop
How to turn day photo into night
Dual tone effect Photoshop
Create night scene in Photoshop
In conclusion
It’s enjoyable and creatively satisfying to use Photoshop to turn a sight during the dayphoto into a moody nighttime photo. In order to create a realistic night effect, this article showed you how to use Color Lookup layers, curves, gradient maps, and layer masking. The day-to-night transformation technique is a vital tool for any digital artist, regardless of whether you want to enhance your Photoshop skills or add a dramatic touch to your images.
Are you prepared to work your magic? To share your creation with the world, Create with your image and follow these instructions for making Day Photo to night Scene Photo