I created this video using dzine’ AI video Lip Sync feature.
Ai Lip Sync has reached the next level. They don’t just speak, they speak and move together across languages across universes. Stick around to learn how to make your own lip synced Videos.
Hey I’m going to show you exactly how to make natural speaking videos like this using dzine for your own projects.
Let’s get started in today’s workflow. We’re going to do this in three simple steps.
First, we create an image to set the scene. Second, we’ll turn the image into a video and finally we’ll add LIp sync to the video.
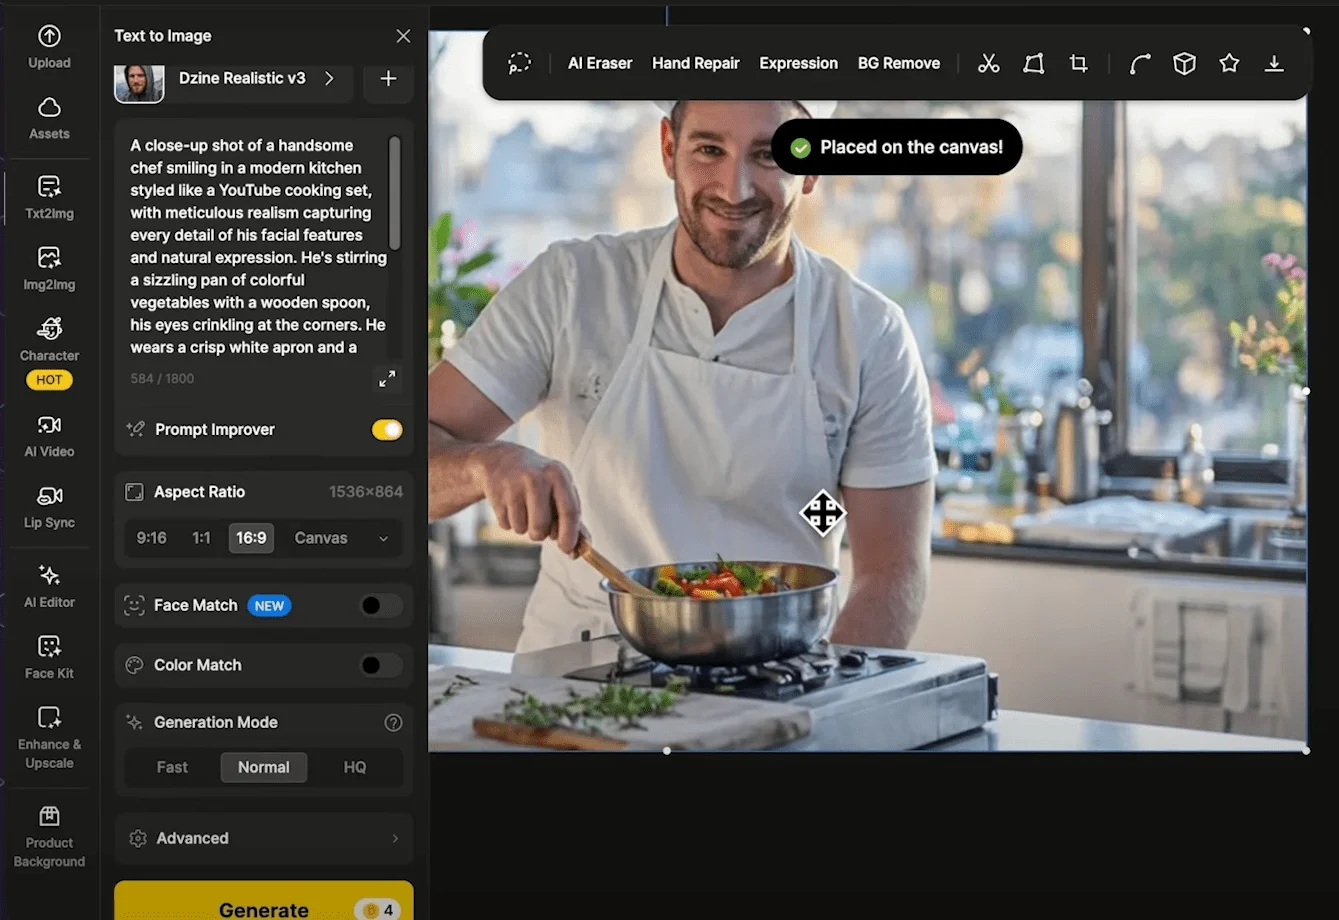
Let’s start by creating our image using the Text to image tool. This is going to be the foundation of our entire LIP Sync video, so we want to get it right.
First, select your pre prefer style. Both artistic and animated characters can work well with the lifting feature so you can have your pick.
Next, we need to enter the prompt since we need clear facial feature for Lips Sync to work well.
I specify a closeup shot and describe the facial features in details.
I also select the HD mode because higher quality images give us much better results in the animation and lifting steps.
Everything is said, let’s click, generate. I generated a few options and this one has clear facial features and great lightinging and also visible lips.
This can work well with the Lip sync so I’ll send this to the canvas and before animating the image I like to make sure the image quality is good.
So I normally enhance the image quality first with the enhanced and UPS skill tool so like portrait since we’re working with a human face and then select your prefer strength option.
Now the details are much more refined after the enhancement. Send the enhanced result to the canvas or download for the next step.
Next step is image to video. Now, let’s bring the image to life, head over to AI video and select image to video.
Dzine Ai – https://www.dzine.ai/aiTools
tutorial- https://youtu.be/a9cWYydIpxI?si=vohstYbvG5tHeAlC
First, we pick a video model. We’ve got many video model options to choose from.
Each one has different costs and capabilities.
You can see a brief highlight of what each model is best for while you hover over them.
Some give you longer durations and some give you camera controls.
Some have start an aim frame for better control.
I’m going with cling two because the video quality is the best, but at the same time it cost you more credits than others. Next, we’ll select our enhanced image as the starting frame.
You can choose the image from the canvas.
We send it to earlier or upload directly from your computer.
Now. Here’s where you describe why you want to happen.
We want to keep it simple and specific.
Something like the man is talking to the camera while cooking down.
Here we can set the Imagination slider.
We can slide it to the right for accuracy and relevancy to your prompt and left for more creative interpretation.
I’ll put it in the middle for now and then we’ll select the duration.
I think five second is good enough for this clip and here you will see the credit cost for this generation.
Click generate to create a video.
The result looks pretty good. We want natural movement that can fit with speaking and this one’s great.
His face is clear and his lips are visible to the camera. This is exactly what we need for great lips sync material. And now we’re ready for lip sync.
Click the lifts sync tool to enter the lifts sync panel.
Next, we need to upload either a face image or video.
We want to upload the video we just created to send the video to the panel.
We can either directly upload a video file from the computer or click lift sync under the video in the result panel.
Next, let’s create the voice click, pick a voice and there are two options, text to speech or upload your own audio.
Let’s try the text to speech first.
First, we enter what we want our character to say.
Next we can select the voice. There are many language options and for each language there are different voice options for us to choose from.
We can click preview to listen. The people who are crazy enough to think they can change the world are the ones who do. I think this is a really nice way to just talk naturally together.
Here we can adjust the speed of the speech if it goes over the video duration a bit.
You can adjust the speed faster and see if it can fit the duration better.
Click PLAy audio to create and listen to the text to speech audio preview. The secret of this recipe is a pinch of salt and a lot of love.
I think this one sounds good. You can see the duration of the speech here timess a bit short.
I like to adjust the speed to create something closer to the five second duration and now it’s perfect.
Also, the punctuation and the ways you write your text prompt can actually affect the results.
Let me try a few as example, this is the original.
Can you hear the differences after we get a satisfying result? Hit generate to Sy the voice to the video and here’s a result.
Let’s try to lift syn this video with the audio elbow option and I want to see if we can make her sign.
So I created an AI song and use caput to isolate just a vocal track,
so it’s easier for Lip Sync, you can use any STEM splitting software to easily isolate any vocal and we upload the vocals for this input. After uploading the audio, see that the audio is actually 7.1 seconds,
but our video is only five seconds long. Ideally.
I should have created a longer video to match the audio lens, but since the system allows it, let’s see what happens and here’s the result. It’s my moment I’m taking the chancing on Lost.
In this dance, we see that the video actually loops back to accommodate the longer audio.
This actually looks pretty cool.
The lip syn still look natural even with the extended duration, and this clip could easily fit into a Disney style music video.
But if you have multiple characters in one scene I’m actually surprised it can work well with multicharacter scene as well.
The PRE process is basically the same upload your video and when the system detects multiple characters.
prompt you to select which person you want to live sync to. Then we can lip Sync The character just like we did before.
It’s your turn to get creative. Try out using the link below.